Implement / machine settings
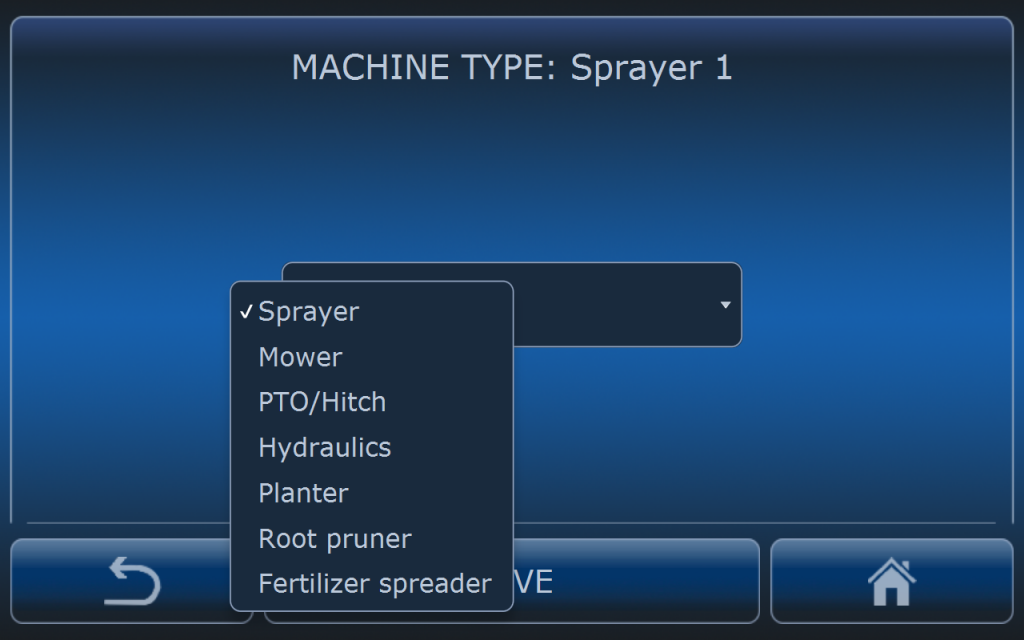
Every type of the machine has it’s separate and individual settings. Before using the system propper settings has to be done and suitable implement has to be selected from the list.
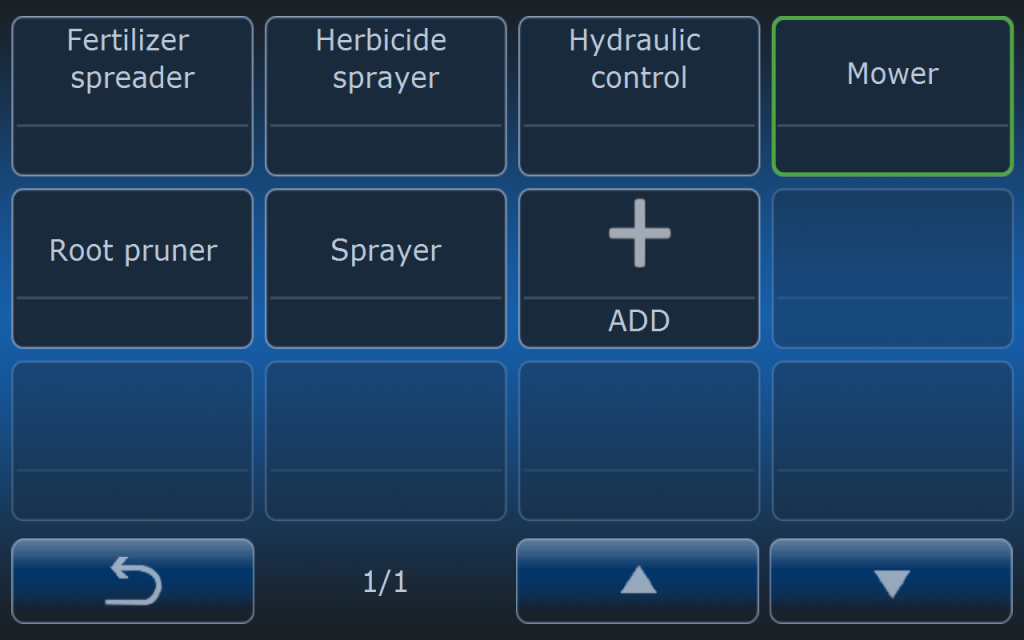
Implements are available depending on the subscription plan user has selected:
- sprayer
- mower
- planting machine
- root prunner
- fertilizer spreader
- herbicide sprayer
The list of the available implements can change. GOtrack is still developing new features of software.
All settings available in the certain implement menu are assigned exactly to that implement. If needed user can create more than one implement of the same type (for example 3 mowers) with different settings for each one. In this way user can easly switch between implements without additional changes in settings.
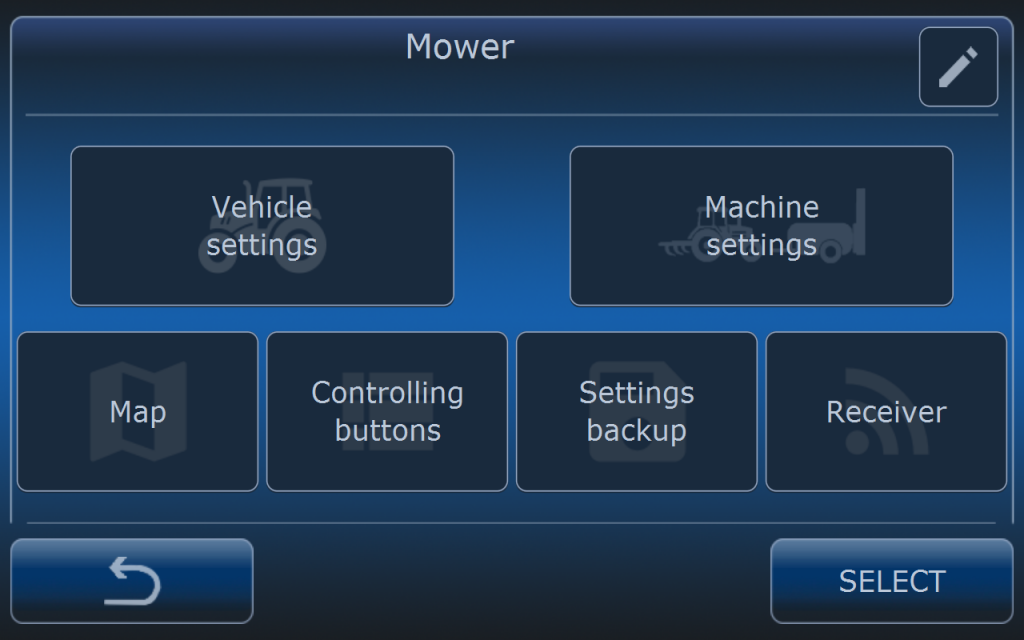
Settings are divided into two main groups:
- vehicle settings
- machine (implement) settings
Besides vehicle and machine settings there are main settings which are related to the map, control buttons, settings backup and receiver.
Settings which are assigned to the implement:
- Vehicle settings: speed, engine RPM, PTO and hitch, electrical settings, hydraulic settings, extra control rules,
- Implement settings: dimensions, electric outputs, sensors, extra control rules,
Common settings for the vehicle and implement:
- map
- control buttons
- settings backup
- receiver
VEHICLE SETTINGS
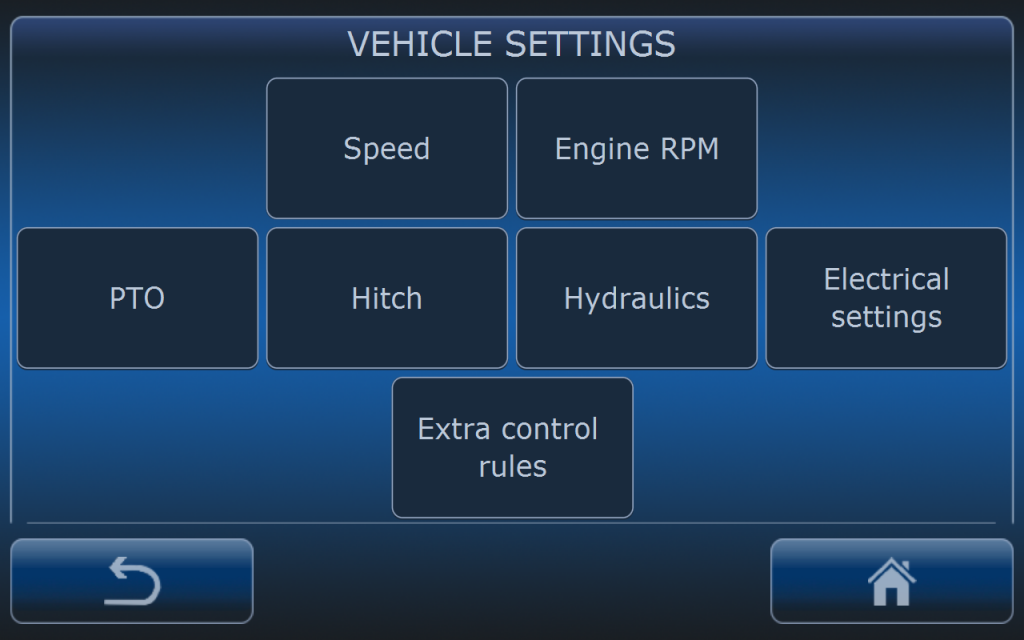
Available settings are dependent on the system options which were selected from the list of available options and also possibilities of hardware integration with the vehicle (tractor). For example when PTO switching on is mechanical then it is impossible to integrate AutoDrive system with this functionality. When hitch control was not ordered then hitch cannot be controlled by the AutoDrive system.
SPEED
Speed settings are described precisely in the Speed management article. It is recommended to read it first.
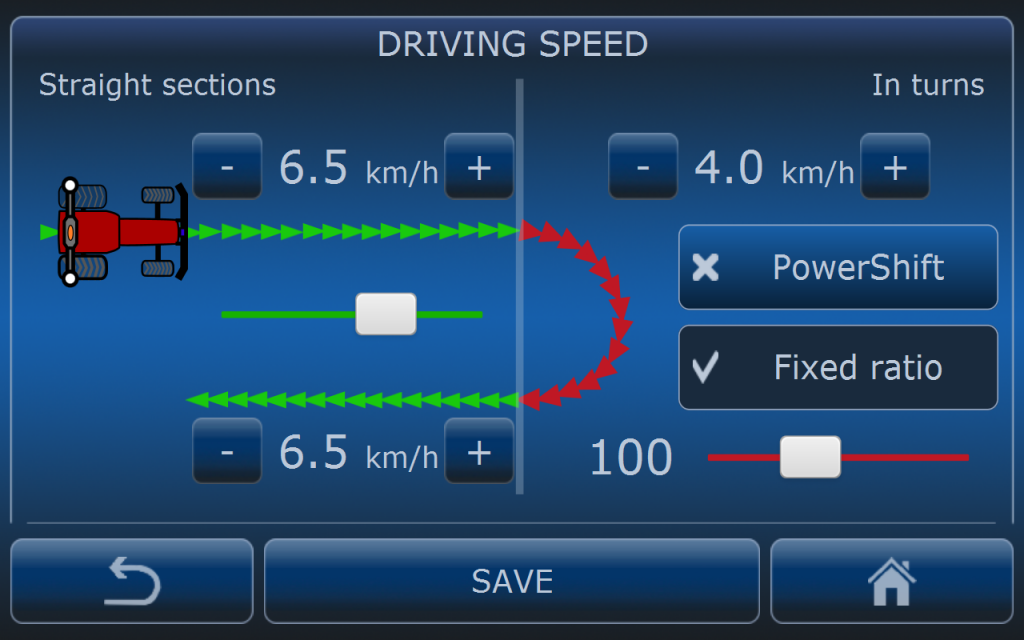
This menu is divided into:
- straight sections which is presented in green colour
- in turns which is presented in red colour.
Speed can be set individually for straight sections and turns. It means system will slow down the tractor in turns if turn condition is fulfilled (read more in Turn definition) and will drive the tractor at the straight sections of the route.
If AutoDrive system has no precise speed information from the vehicle (it is not connected by CANBUS with the tractor) and speed source is GNSS receiver then speed in turns may be not precise as expected. It is recommended then to use Fixed RPM or Fixed ratio (does not apply to Fendt Vario). When this option is active then AutoDrive system will not use speed in turns value but will set fixed engine RPM or transmission ratio. Speed in turns value will be only a reference for detecting speed error if tractor is not able to achieve this speed.
PowerShift. If tracotr is equipped in powershift and AD system is connected to it then speed in turns can be reduced also with powershift if this is enabled in the menu. When turn is detected then AD will change powershift to turtle mode and when there is straight section detected then AD will change powershift to rabbit mode.
ENGINE RPM
Depending on the tractor type different menus will be visible under the Engine RPM menu in the Vehicle settings. These menus are also accesible directly in the GOtrack GPS menu depending on the vehicle type that system is installed on.
STARRTING REVS
Starting revs settings are described precisely in the Starting revs article. It is recommended to read it first.
Starting revs menu is in the Engine RPM menu when AutoDrive system is installed on the tractor with mechanical gearbox. It is used to adjust engine’s RPM for the moment when the tractor starts driving autonomously. Some implements need RPM increasement in this moment so the engine is not choked.
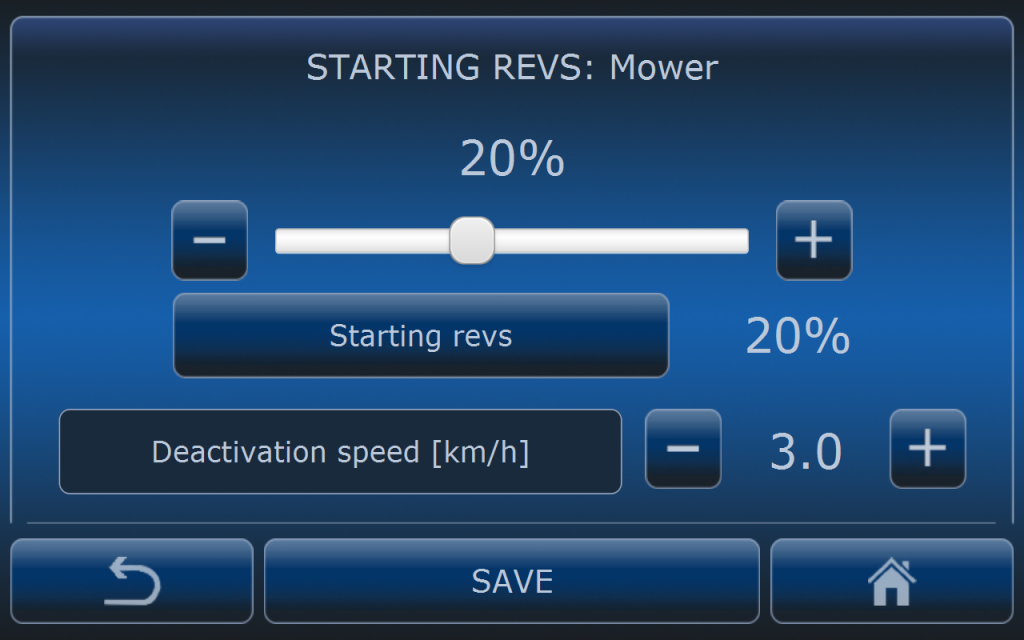
Using the slider demanded percantage of RPM range has to be selected. When entering this menu vehicle’s RPM will be in the idle mode. When percentge is changed then computer will adjust RPMs to the selected value. After pressing SAVE button RPM level will be return to idle.
Deactivation speed is speed level in which computer will change starting revs level into normal revs control in order to achieve demanded speed level.
Settings presented on the picture above will cause that GOtrack computer will set vehicle’s revs to 20% of RPM range and when 3 km/h will be exceeded then computer will switch into normal revs control in order to achive demaned speed level. Startings revs are active only to the moment of achieving deactivation speed. Then they are not used until next vehicle start.
CONSTANT OPERATING REVS
If AutoDrive system is installed on the tractor with CVT (except Fendt) or HST transmission then Constant Operating Revs are available in the Engine RPM menu.
Constant operating revs settings are described precisely in the Constant operating revs article. It is recommended to read it first.
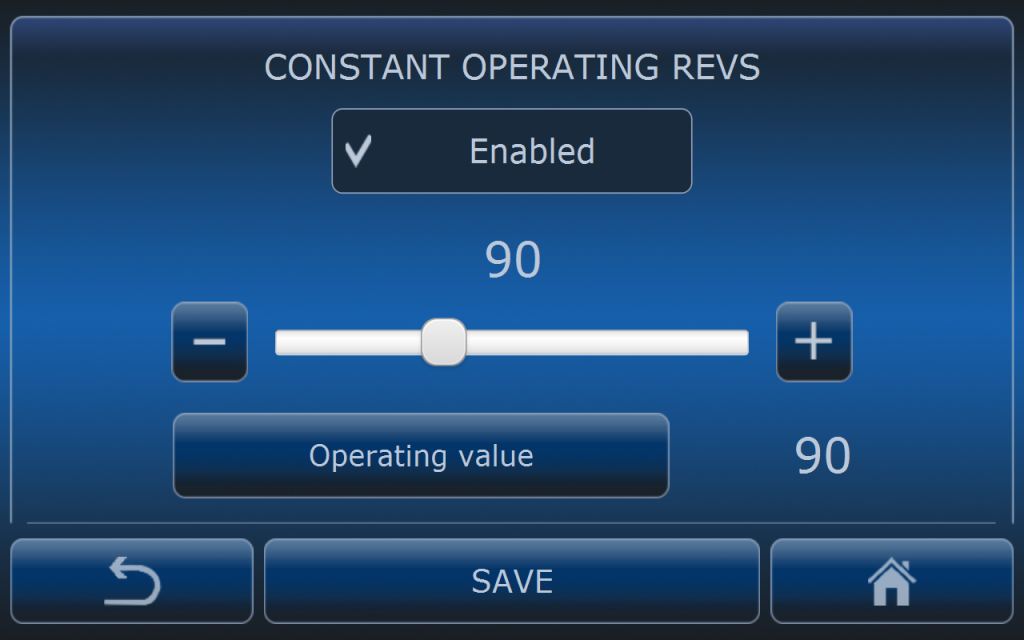
When Constant operating revs are enabled then AutoDrive system will set engine’s revs to the constant level during autonomous operation. Speed adjustmets will be done by transmission ratio. When tractor stops to drive then revs will be set to idle.
REVS CONTROLLING – FENDT VARIO
If AutoDrive system is installed on Fendt Vario tractor then Revs controlling are available in the Engine RPM menu.
Revs contrlling settings are described precisely in the Revs controlling – Fendt Vario article. It is recommended to read it first.
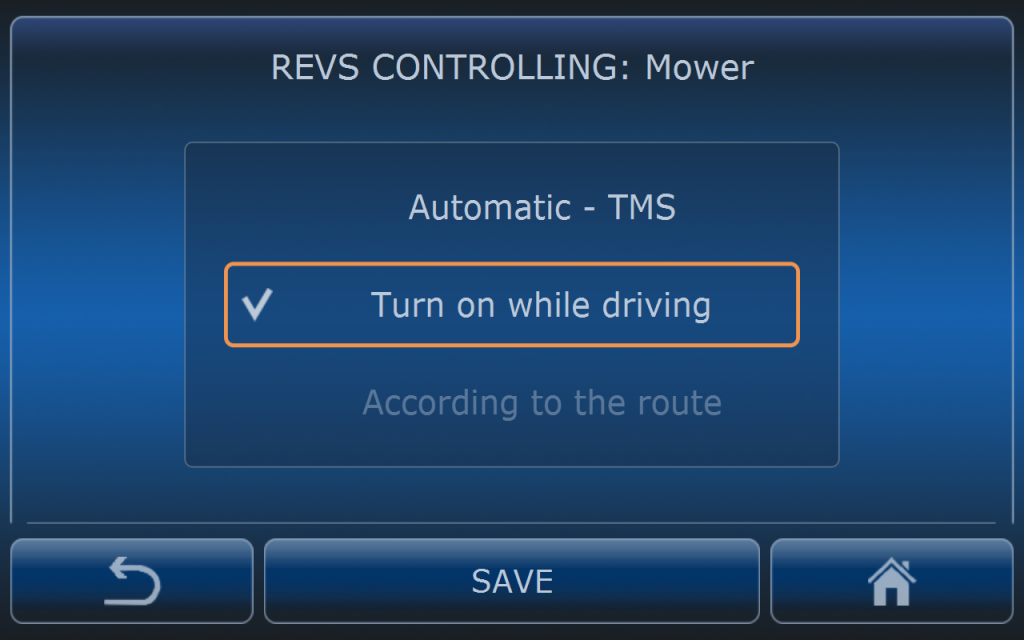
Operator has at the moment 2 options to select revs controlling method:
- Automatic – TMS – when it is selected AutoDrive system does not control tractor’s revs. It is done by tracotr itself if TMS is enabled on the tracotr’s control panel,
- Turn on while driving – when it is selected AutoDrive system will recall revs level from the tractor’s memory (if Fendt gen3 revs are recalled from memory 1). RPM level must be set before in the tractor. While driving system will activate RPM tracotr memory and when stopped system will switch off RPM memory.
PTO
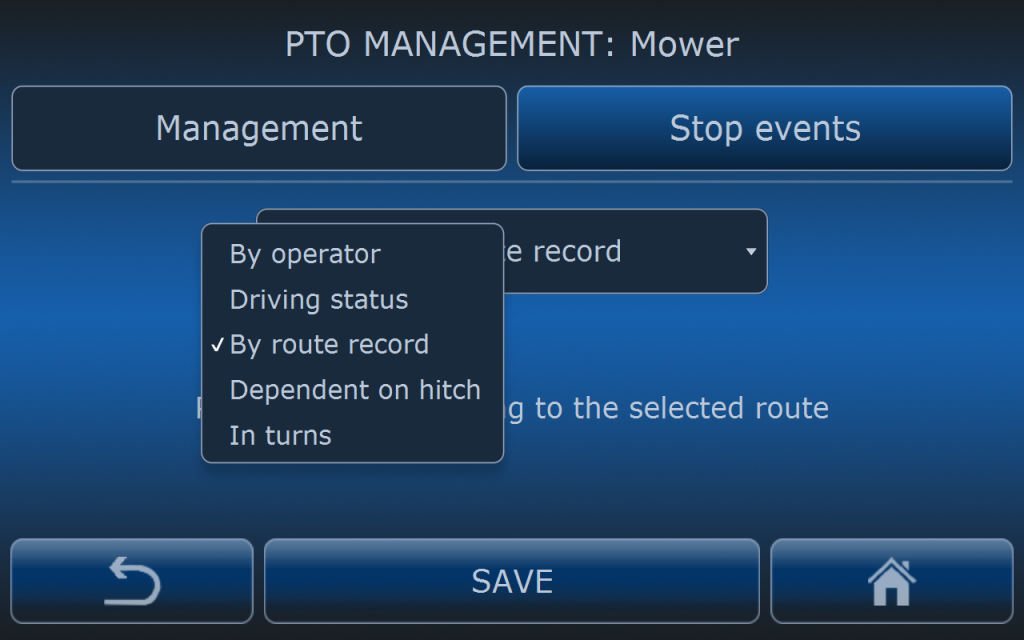
PTO management menu is divided into two sections. In the MANAGEMENT section operator can select how PTO will be managed:
- by operator – AD does not control PTO.
- driving status – AD turns PTO on when driving and turns it off when stopped.
- by route record – AD turns PTO on when it was on during recording the route and turns it off when it was off.
- dependent on hitch – operator can select PTO status depending on the hitch status. PTO status will change according to the hitch positions selected in the menu.
- in turns – PTO status will change according to the section of the route. See pictures below.
Most commonly used can be: by operator, by driving status or by route record.
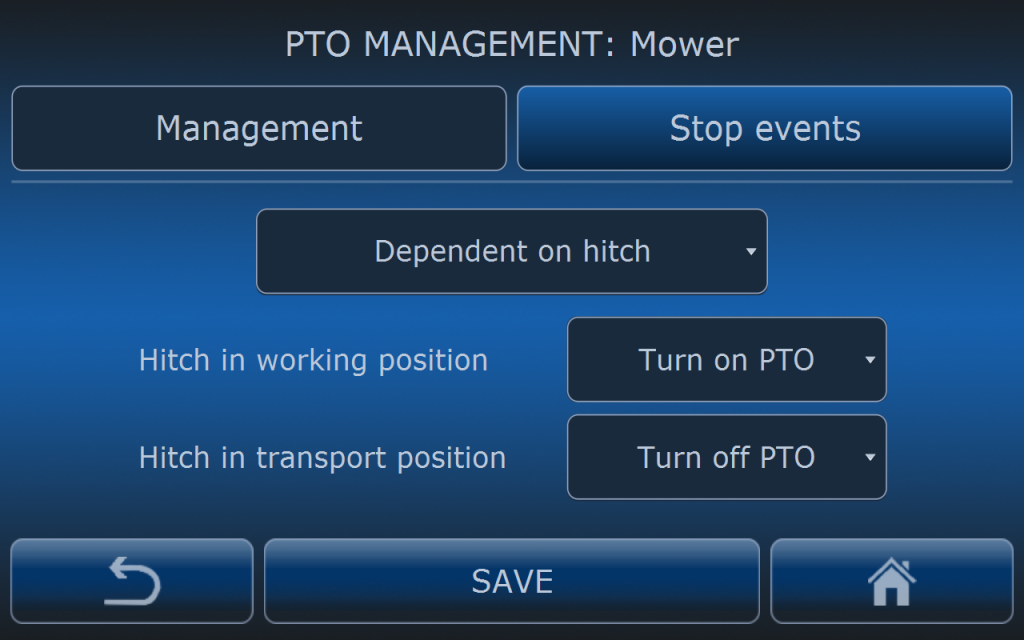
In this case AutoDrive will turn on PTO when hitch is in the working position and will turn off PTO when hitch is in the transport position.
This setting can be used in case the route was not recorded with PTO so there is no reference in the file to turn on PTO based on the route record.
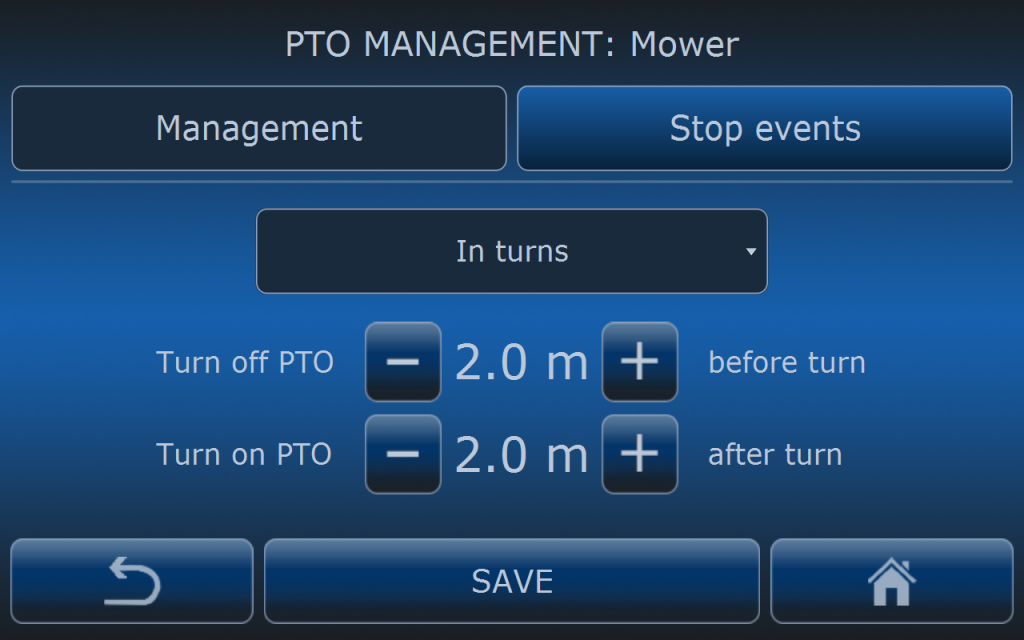
In this case AutoDrive will turn on PTO when tractor is 2 meters after the turn (according to the turn definition) and will turn off PTO 2 meters before turn.
This setting can be used in case the route was not recorded with PTO so there is no reference in the file to turn on PTO based on the route record.
PTO STOP EVENTS
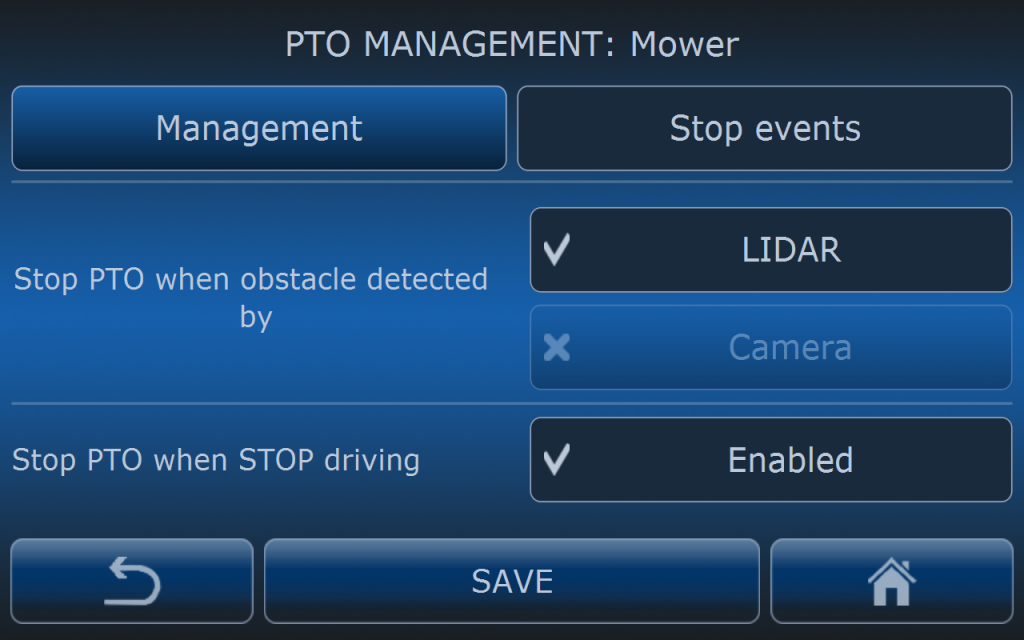
In the STOP EVENTS section of PTO settings, events for stopping PTO can be selected.
PTO can be stopped when there is obstacle detected by the LIDAR or the ODC camera. Also PTO can be stopped when tracotr is stopped.
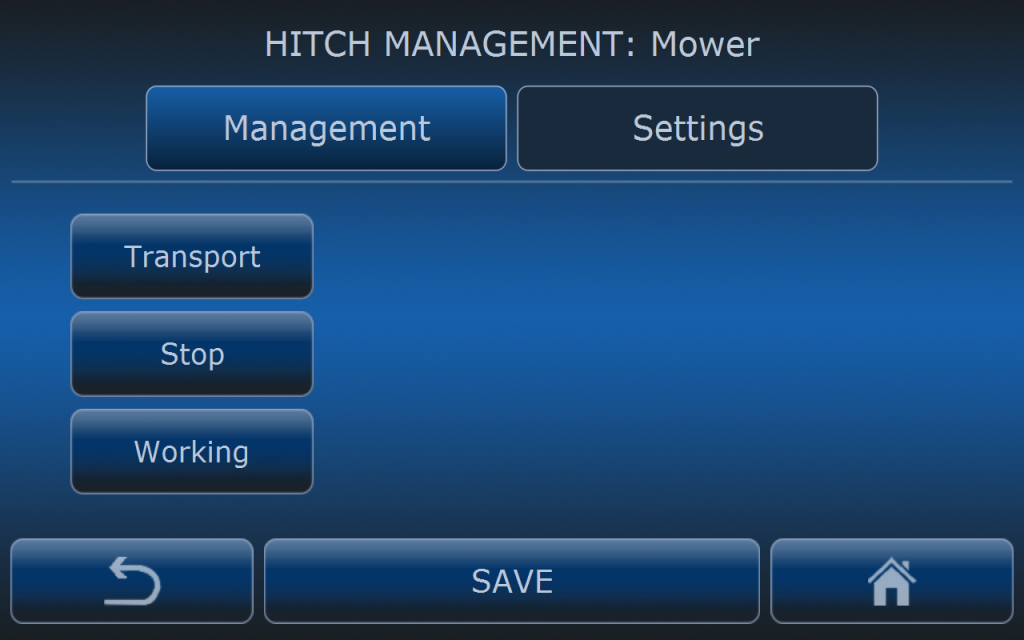
HITCH
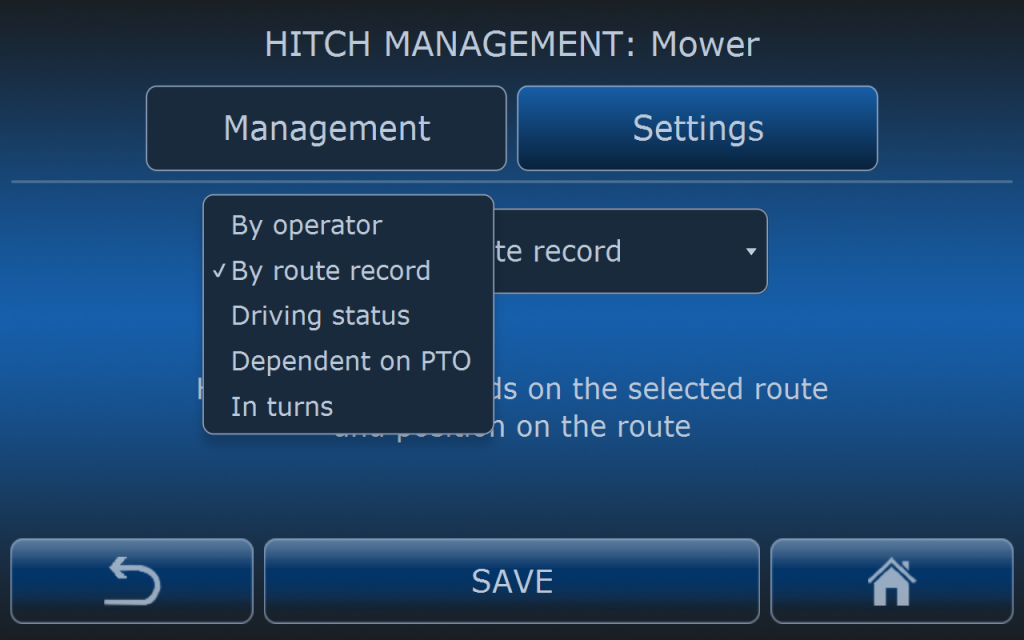
HITCH management menu is divided into two sections. In the first section operator can select how HITCH will be managed:
- by operator – AD does not control hitch.
- driving status – AD sets hitch into working position when tracotr is driving and sets hitch in transport position when tractor is stopped.
- by route record – AD is changing hitch position according to the selected route. When route is recorded hitch position is also saved in the route file.
- dependent on PTO – operator can select hitch position depending on the PTO status. Hitch position will change according to the PTO status.
- in turns – hitch position will change according to the section of the route. See pictures below.
Most commonly used can be: by operator, by route record and in turns.
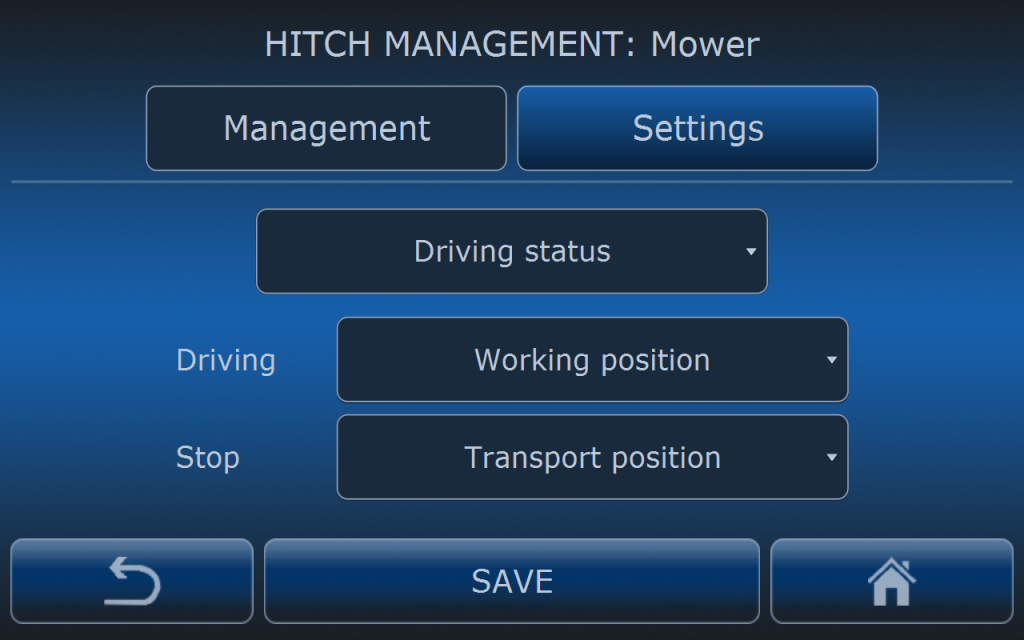
With these settings hitch will change it’s position to working position when tractor is driving and will change to transport position when tractor is stopped.
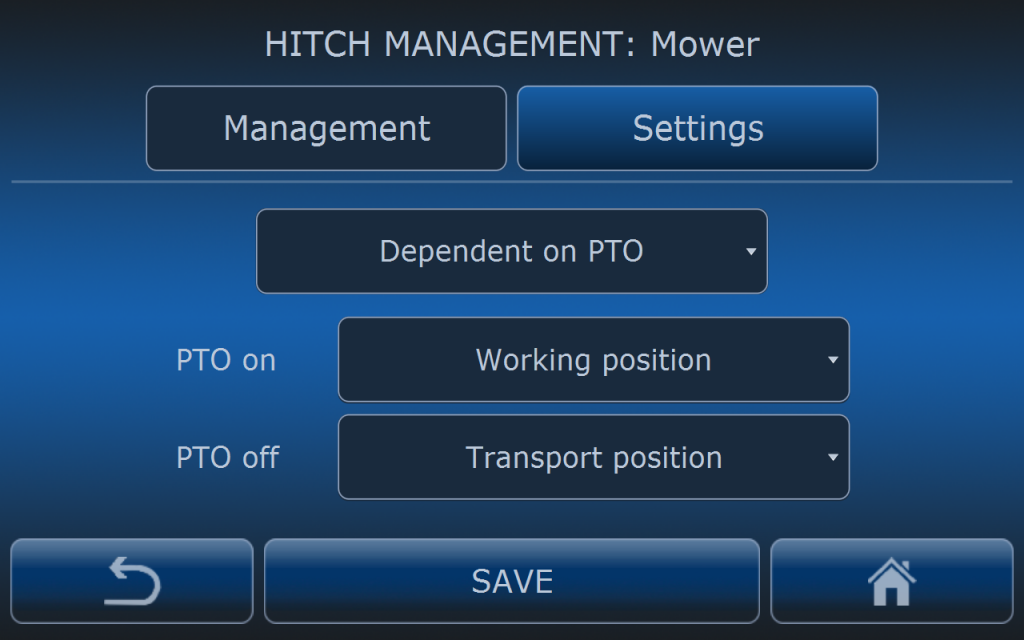
With these settings hitch will change it’s position to working position when PTO is on and will change to transport position when PTO is off.
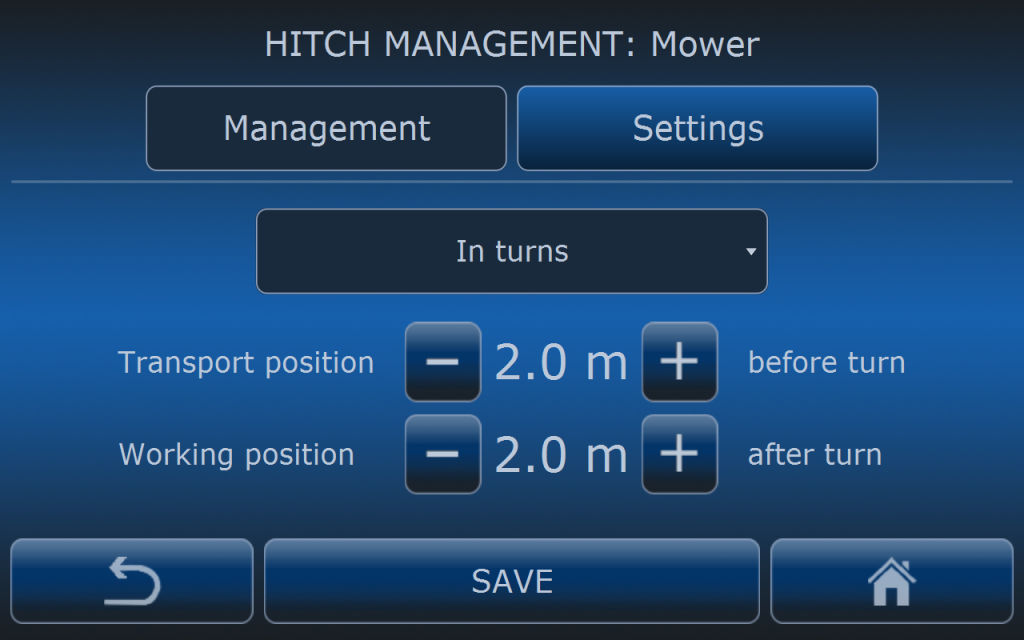
With these settings hitch will change it’s position to transport position 2 meters before turn (according to the turn definition) and will change to working position 2 meters after turn.

WARRNING!!! When adjusting transport and working position hitch can change it’s position. Please make sure there is nobody in close implement neighbourhood.
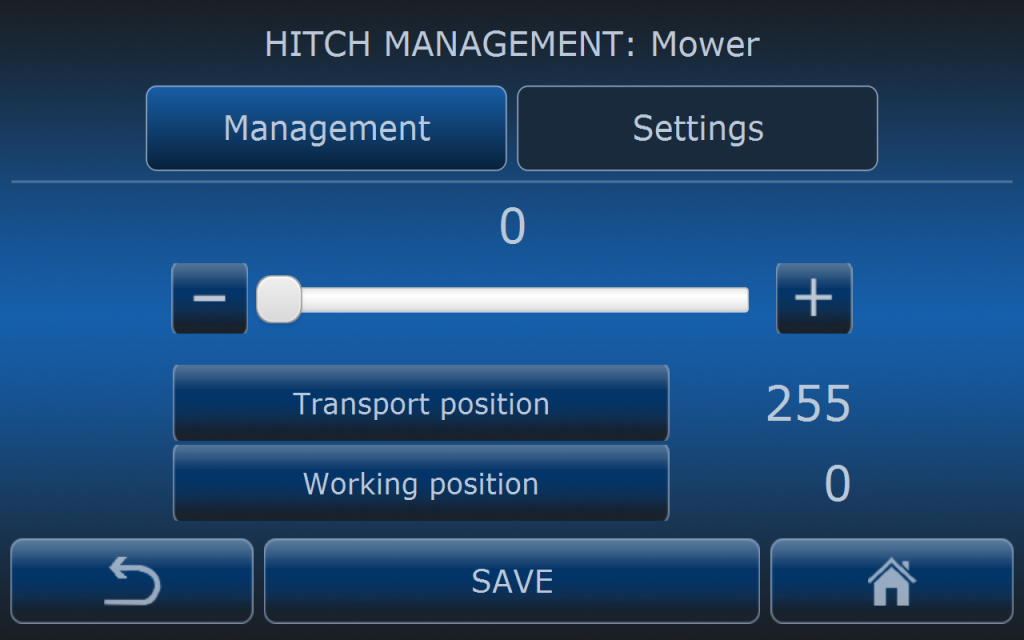
This menu is visible only for some type of tractors where AutoDrive is connected to the tractor’s EHR module.
In Settings menu operator can set transport and working positions. Move slider to the demanded hitch position and then press Transport position or Working position button depending on which position you want to store. When finished press SAVE button.
AutoDrive will change position of the hitch depending on the selected hitch mode and stored positions.
This menu is visible for Fendt Vario tracotrs (gen2. and gen3 ).
For these type of tracotrs hitch positions are set by the operator on the tractor’s control panel not in the GOtrack computer. This menu is only presenting which hitch position is at the moment recognized.
When tractor is driving autonomously, AutoDrive system is changing hitch positions which are adjusted on tractor’s control panel.
HYDARULICS
This feature is not available yet. Depending on the tractor model and installation possibilities AutoDrive can control hydraulic outputs in the feature. Ask dealer for more information.
ELECTRICAL OUTPUTS
This feature is not available yet. Depending on the tractor model and installation possibilities AutoDrive can control electric outputs in the feature. Ask dealer for more information.
MACHINE SETTINGS
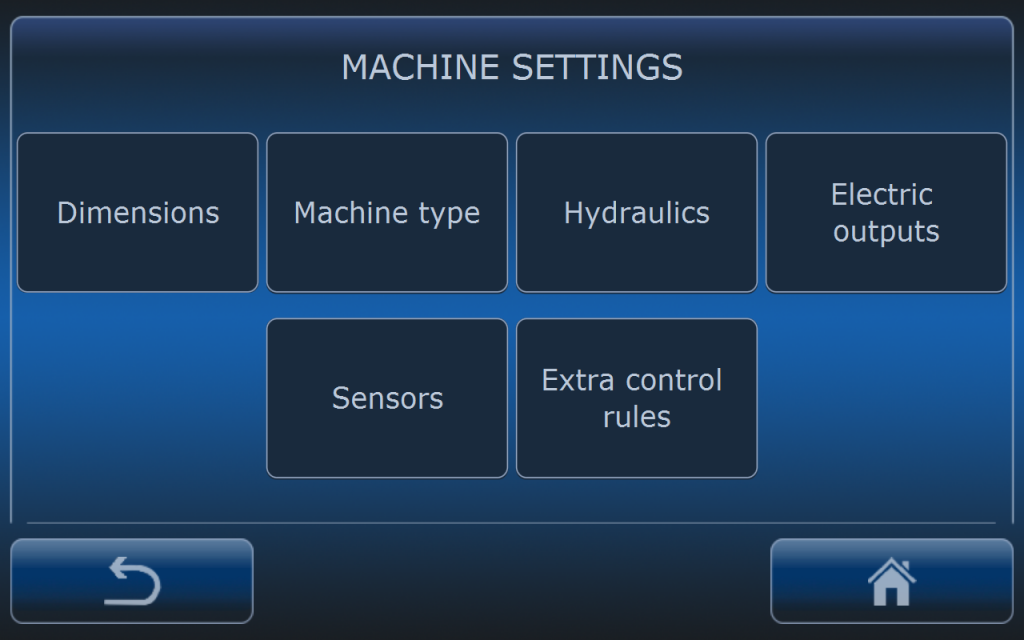
MACHINE SETTINGS menu are divided into:
- dimensions
- machine type
- hydraulics
- electric outputs
- sensors
- Extra control rules
DIMENSIONS
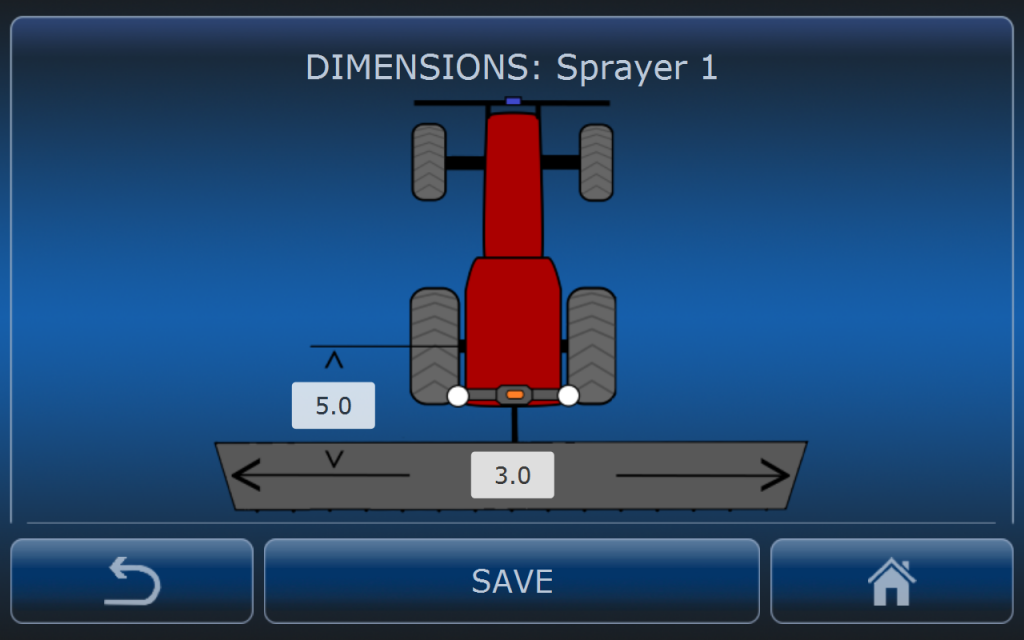
Dimensions of the implement is very critical setting especially for propper section control (in case of the sprayer). Distance to the implement must be set precisely before operator starts to record the route.
When this setting is incorrect the route will not be suitable to use with implement with different dimensions.
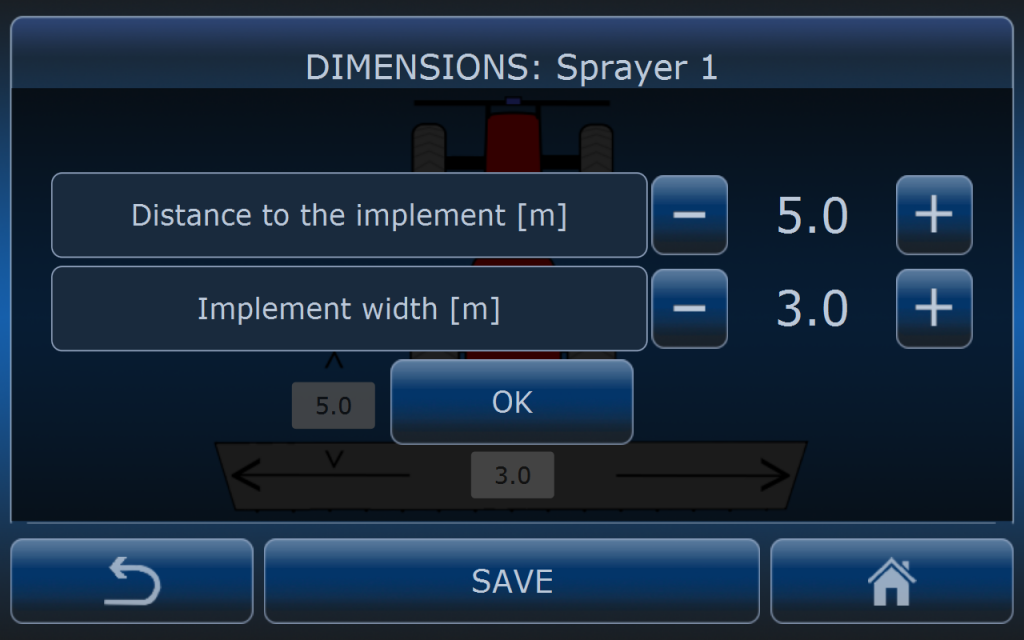
Distnace to the implement is the distance from the rear axle to the working part of the implement. This setting creates position offset of the working element so in case of changing machine to another with different dimensions recorded route will be still suitable.
Implement widith has influence only for shading area on the map so operator can see which part of the field is already treated.
MACHINE TYPE